---
title: "Concierge Code when a Pardot Form is on a Native Pardot page (Non-iFrame)"
source_url: https://help.chilipiper.com/hc/en-us/articles/1500011223882-Concierge-Code-when-a-Pardot-Form-is-on-a-Native-Pardot-page-Non-iFrame
article_id: 1500011223882
updated_at: 2026-07-24T18:55:59Z
content_hash: d1ea3e88
---
When using Standard Pardot Forms on a Pardot page and trying to integrate Chili Piper, we take advantage of the form's default completion action URL and will append field values as query string parameters.
Note this does not work with the [iFrame implementation](https://help.chilipiper.com/hc/en-us/articles/1500010544381) code, and the implementations are not interchangeable. If you update the code below, make sure you update it in all areas.
This article will cover how to successfully implement Chili Piper with Pardot forms on native Pardot pages:
- Add custom code to your Pardot form settings
[Look & Feel → Below Form Code Editor](#h_01EPAECBDNZ7GV9SYE6E741K0X)
- [Parent Webpage Code](#h_01EPAEETJ5GDYGW6AVBEP7H7SX)
- Optional[Custom field names using CSS class names](#h_01JZ3CX9768NCD7FYQEGZQD4FX)
## Look & Feel → Below Form Code Editor
**Please get the latest version of this implementation from******[**here**](https://docs.google.com/document/d/1Hdww6Le_QryuyS5ZOmxArgx1V796areUefuQ5A8c8SM/edit?usp=sharing)**.**
Paste the code in as shown here:
###
Hit _**Confirm & Save**_
## Parent Webpage Code
Add the following to the code view of your parent page within Pardot:
```
```
## Custom field names using CSS class names
When looking for field names to use, we check the CSS class names first, then placeholders and labels. Sometimes your form labels need to be complex and include some simple instructions, making the label hard to read and use for mapping in Chili Piper. With this implementation, you can specify field names using CSS Class names in Pardot. This will make mapping easier and more predictable.
Here is how to specify a CSS class name on a Pardot field:
- Open your form in Pardot and click the Edit Button - Fields - Small Edit icon next to the field.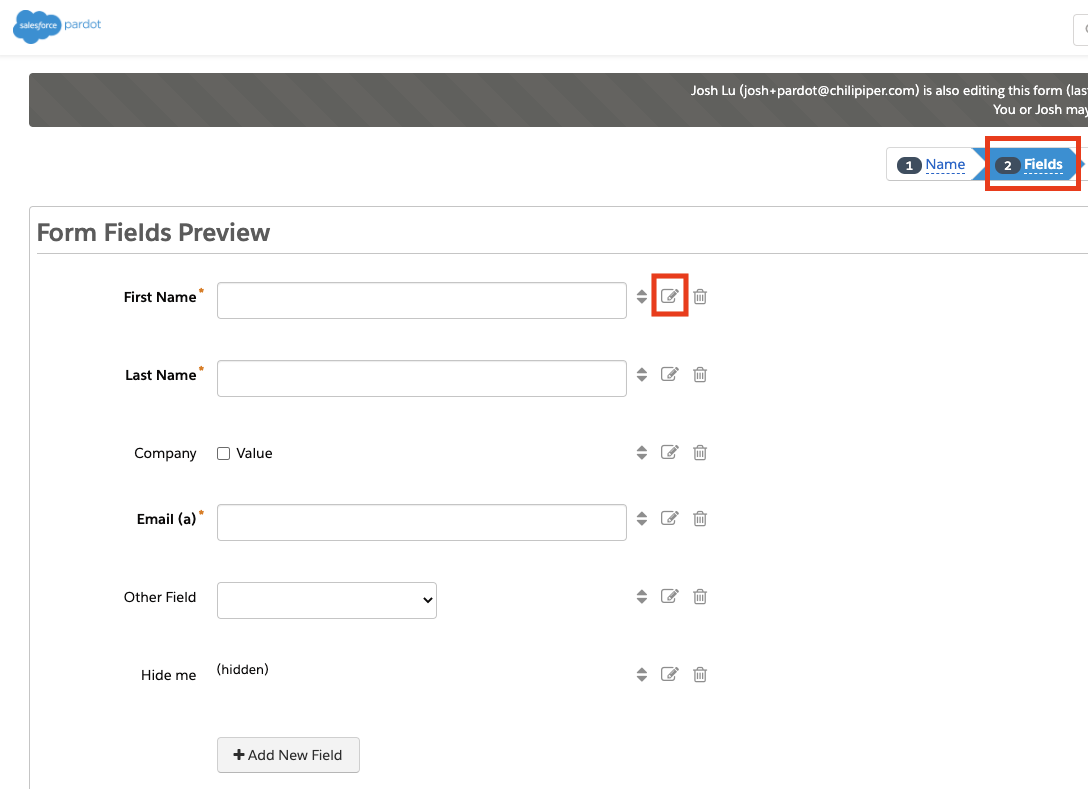
- From here, click on Advanced and enter a CSS Class name starting with "CP_".For example, "CP_FirstName".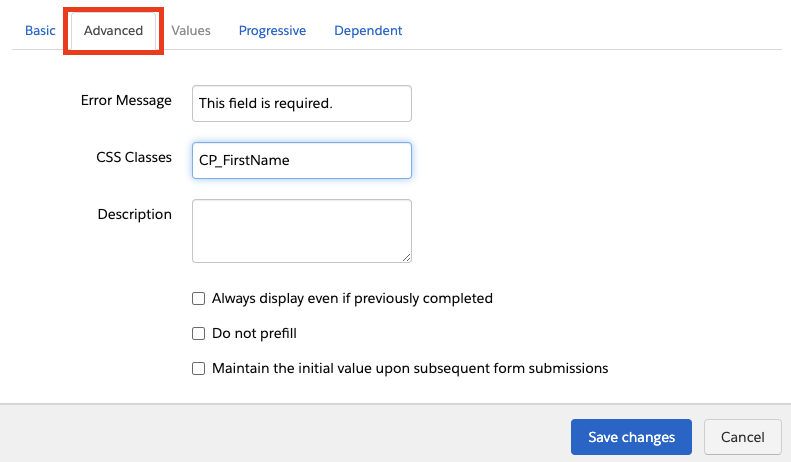
- That's it! Now save and repeat for any other fields you want to specify a name for.